


Table of Contents
How to Install VS Code for Java – Complete Beginner-Friendly Guide (2025)
Install VS Code for Java to get a fast, lightweight, and customizable setup without the heavy load of traditional IDEs. With the right extensions, Visual Studio Code becomes a powerful Java environment that’s perfect for beginners and pros alike.
1) Why Use VS Code for Java?
- Lightweight & fast compared to heavy IDEs
- Extensible with rich Java tooling
- Beginner-friendly and cross-platform (Windows/macOS/Linux)
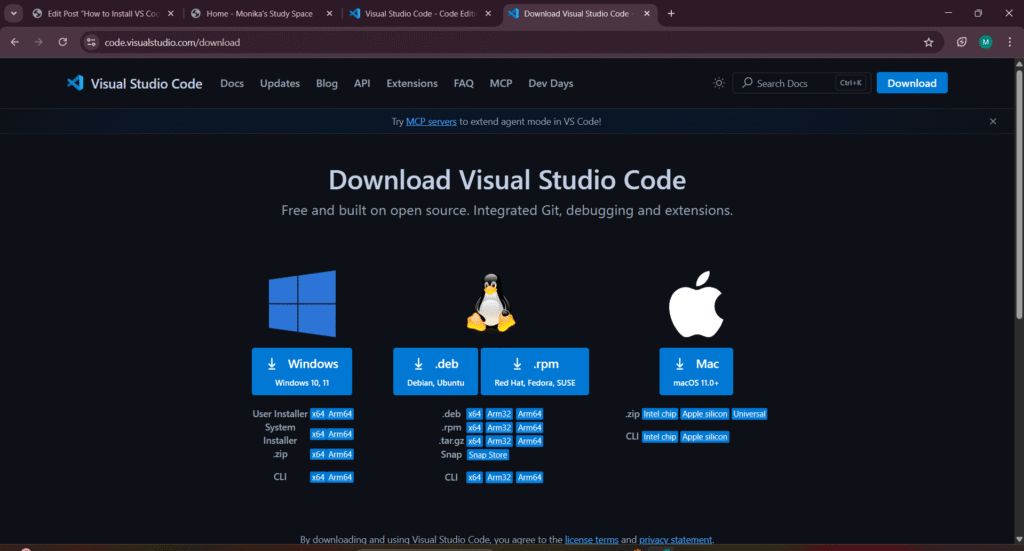
2) Install VS Code
Download & install VS Code:
https://code.visualstudio.com/
During setup on Windows, tick:
 Add "Open with Code" action to Windows Explorer file context menu
 Add "Open with Code" action to Windows Explorer directory context menu
 Add to PATH
3) Install Java (JDK)
Download JDK (choose one source):
https://adoptium.net/
https://www.oracle.com/java/technologies/javase-downloads.html
Verify installation (any OS):
java -version
javac -version
You should see a version (e.g., 21.0.x). If the command is “not recognized,” fix PATH or re-install the JDK.
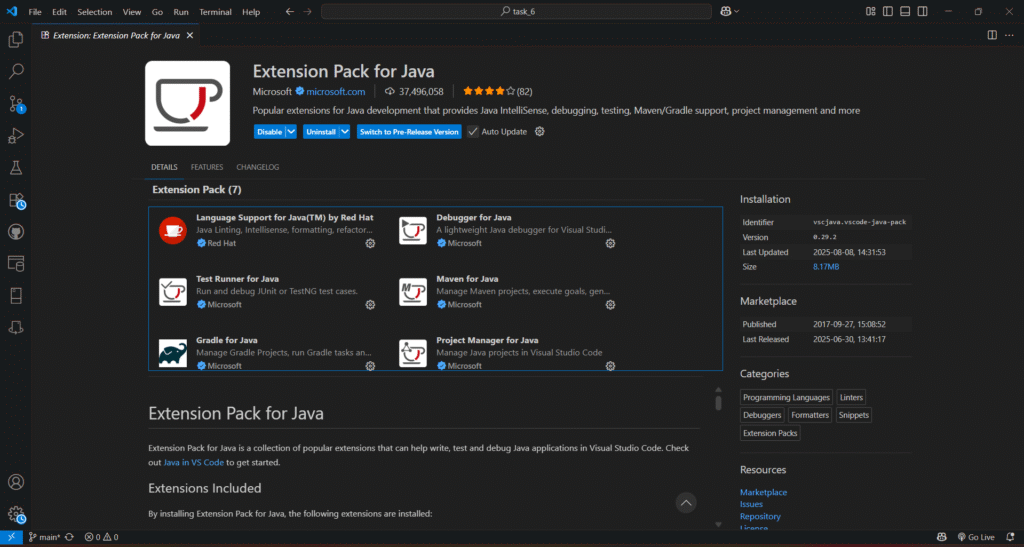
4) Install VS Code Extensions for Java
Open VS Code → Extensions (Ctrl+Shift+X) → search and install:
Extension Pack for Java
This bundle includes:
Language Support for Java™ by Red Hat
Debugger for Java
Java Test Runner
Maven for Java
Project Manager for Java (Dependency Viewer)
5) Quick Test: Single Java File
Create a folder (e.g., JavaPrograms) → Open Folder in VS Code → create a new file HelloWorld.java:
public class HelloWorld {
    public static void main(String[] args) {
        System.out.println("Hello, Welcome to Monika's Study Space ");
    }
}
Run from Terminal inside VS Code (Ctrl+):
javac HelloWorld.java
java HelloWorld
Output:
Hello,Welcome to Monika's Study Space

6) Create a Java Project (VS Code command)
Open Command Palette (Ctrl+Shift+P) → run:
Java: Create Java Project
When prompted:
Project Type: No Build Tools   (beginner-friendly)
Location: choose your folder
Name: MyJavaProject
VS Code creates a structure like:
MyJavaProject
├─ src
│  └─ App.java
└─ .vscode
App.java
public class App {
    public static void main(String[] args) {
        System.out.println("My first Java program in VS Code!");
    }
}
Run with the Run button (▶ near main) or:
# if you prefer terminal inside project root
javac src/App.java
java -cp src App
Tip: If you see a Run/ Debug code lens above
main, click it—no manual compile needed.
7) Optional: Maven Project (for dependencies)
Create with VS Code:
Command Palette → Java: Create Java Project → Maven
Or via terminal (if Maven is installed):
mvn -v
mvn archetype:generate -DgroupId=com.example -DartifactId=demo -DarchetypeArtifactId=maven-archetype-quickstart -DinteractiveMode=false
Run Maven build:
cd demo
mvn clean package
Open in VS Code (recommended to use the Explorer’s Maven panel):
View → Command Palette → Maven: Reload Projects
8) Useful VS Code Java Settings
Auto Save & Format on Save:
// File → Preferences → Settings (Open Settings JSON)
{
  "files.autoSave": "afterDelay",
  "editor.formatOnSave": true,
  "[java]": {
    "editor.defaultFormatter": "redhat.java"
  },
  "java.configuration.checkProjectSettingsExclusions": false
}
Recommended extensions list for your workspace (.vscode/extensions.json):
{
  "recommendations": [
    "vscjava.vscode-java-pack",
    "vscjava.vscode-java-test",
    "vscjava.vscode-maven",
    "vscjava.vscode-java-dependency"
  ]
}
9) Debugging Java in VS Code
Start debug quickly:
Run and Debug (left sidebar) → Java
Optional launch.json (auto-generated usually):
{
  "version": "0.2.0",
  "configurations": [
    {
      "type": "java",
      "name": "Launch App",
      "request": "launch",
      "mainClass": "App",
      "projectName": "MyJavaProject"
    }
  ]
}
Set breakpoints by clicking the gutter next to line numbers, then hit F5.
10) Common Issues & Fixes
Problem: java or javac not recognized
Fix:
• Reinstall JDK
• Ensure Java bin folder is on PATH
• Restart VS Code after installation
Problem: Run/Debug buttons missing
Fix:
• Ensure "Extension Pack for Java" is installed
• Reload VS Code window (Ctrl+Shift+P → Developer: Reload Window)
• Open the folder as a project (File → Open Folder…), not just the file
Problem: Multiple JDKs causing confusion
Fix:
• In VS Code: Ctrl+Shift+P → "Java: Configure Java Runtime"
• Select the JDK you want the project to use
11) Quick Copy Blocks
HelloWorld.java
public class HelloWorld {
    public static void main(String[] args) {
        System.out.println("Hello, VS Code!");
    }
}
App.java (project template)
public class App {
    public static void main(String[] args) {
        System.out.println("My first Java program in VS Code!");
    }
}
Verify Java
java -version
javac -version
Run single file
javac HelloWorld.java
java HelloWorld
Open Command Palette
Ctrl+Shift+P
Install Java pack
Extensions → "Extension Pack for Java" → Install
Final Thoughts
Now you know how to install VS Code for Java, add the right extensions, and create/run programs using either a single file or a full project. This setup is quick, flexible, and perfect for learning or lightweight development. If you want, I can also add internal links to your other Java posts and craft an SEO excerpt tailored to your blog style—say the word!
External Resources
You May Also Like
If you’re enjoying this beginner-friendly Java series, here are a few of my other helpful posts that you might find useful:
- Java Introduction to Programming: My Exciting Day 1 Journey from Zero to Beginner
My personal first-day experience learning Java — from setting up the environment to writing my very first program. - Java Learning Roadmap 2025 – From Zero to Hero
A step-by-step guide to how I plan to learn Java in 2025, perfect for beginners like me. - Aptitude Tricks for Beginners – Easy Mental Math Techniques
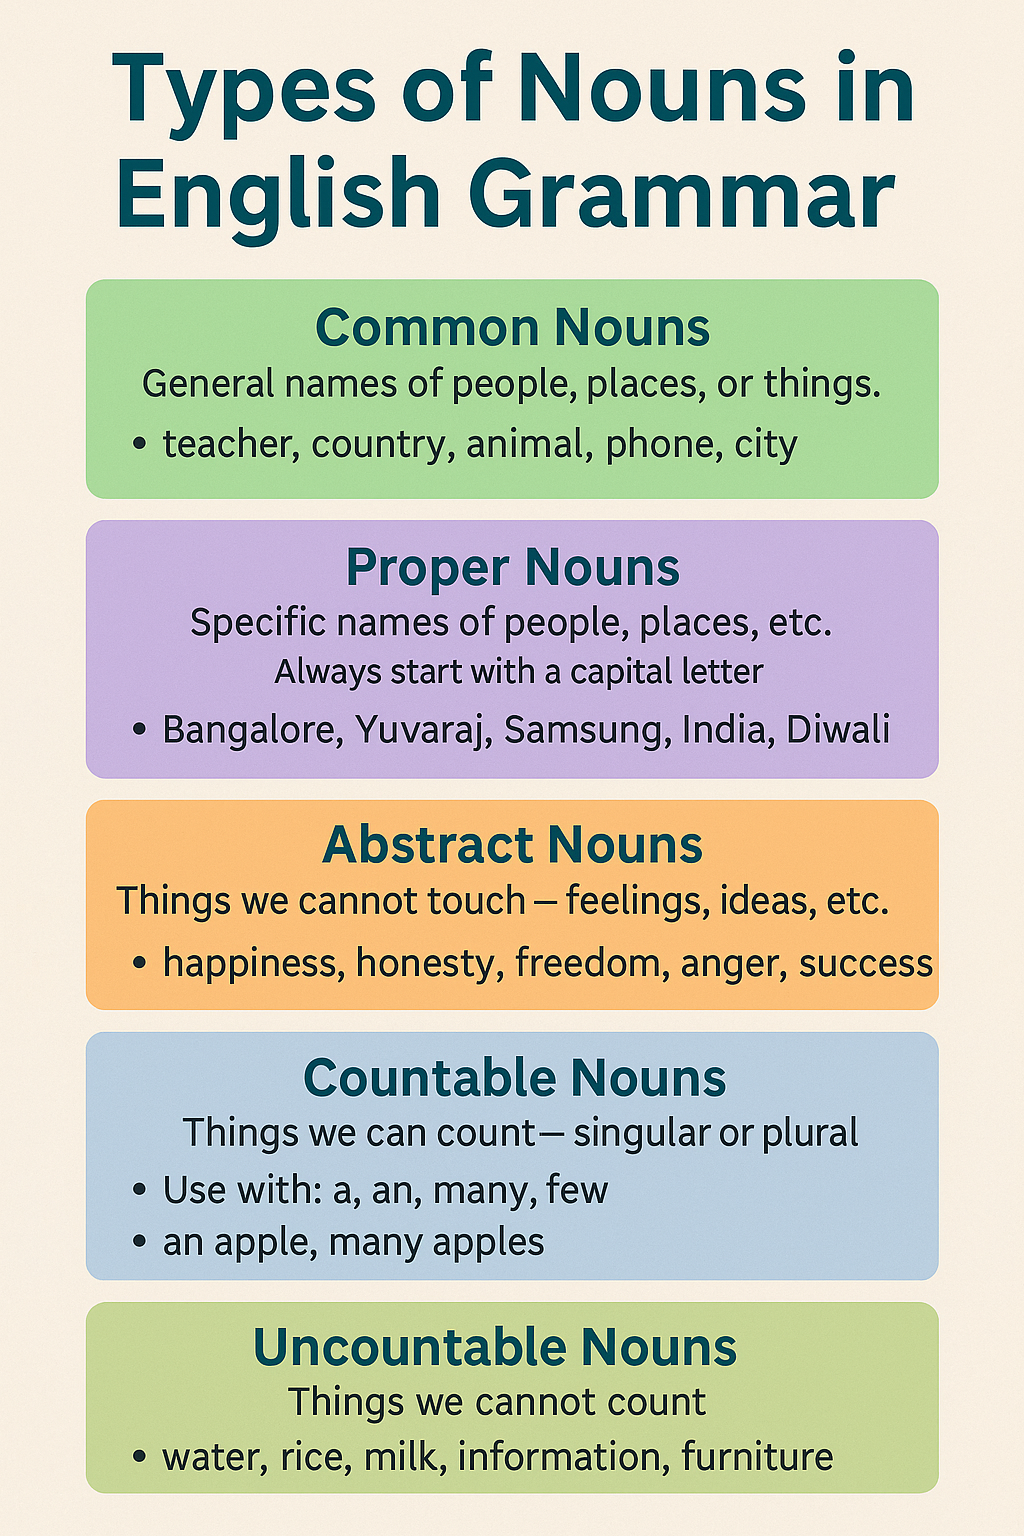
Quick tricks for multiplication, LCM, squaring, and cubes — useful for placement and coding exams. - Types of Nouns in English Grammar – Simple Explanation with Examples
Learn all types of nouns clearly with examples — great for communication skills and competitive exams. - Data Cleaning with Titanic Dataset – A Beginner’s Guide
Learn the complete, beginner-friendly process of cleaning and preparing the Titanic dataset for machine learning, with practical examples and tips. - History Of Java Programming Language
About the Author
Monika N V is a final-year Computer Science Engineering student passionate about Java, web development, and sharing real learning experiences through her blog — Monika Learns.
Join the Conversation
Did this Java setup guide help you?
Share your questions or your own VS Code tips below — I’d love to hear from you! ✨