


Table of Contents
Install Eclipse IDE for Java: Complete Step-by-Step Guide for Beginners
One of the best tools for this is to install Eclipse IDE for Java, which gives you a powerful and beginner-friendly coding environment. If you are starting your Java programming journey, the first step is to set up a reliable development environment. One of the best tools for this is Eclipse IDE. In this guide, I’ll show you how to install Eclipse IDE for Java on Windows, Mac, and Linux, configure it properly, create your first program, and even add some pro tips to make your coding experience smoother.
1. What is Eclipse IDE?
Eclipse IDE (Integrated Development Environment) is a powerful, free, and open-source platform designed to make software development faster and easier. It provides developers with all the essential tools they need to write, edit, debug, test, and run code in one place, removing the hassle of switching between different programs.
Although Eclipse is best known for Java development, it is highly versatile. Thanks to its plugin-based architecture, you can extend its capabilities to work with other programming languages such as C++, Python, PHP, JavaScript, and even web frameworks. This flexibility makes it a one-stop solution for both beginners and professional developers.
Why Eclipse is Popular Among Java Developers
- Free & Open Source – Eclipse is completely free to download and use, with no hidden costs or licensing fees. Being open-source also means it’s constantly improved by a global community of developers.
- Cross-Platform Compatibility – Whether you’re using Windows, macOS, or Linux, Eclipse runs smoothly on all major operating systems, so you can switch computers without losing your workflow.
- Highly Customizable – From installing new themes for a modern look to adjusting fonts for better readability, Eclipse can be tailored exactly to your preferences. You can also extend its features by adding plugins for version control, build tools, or new programming languages.
- Smart Coding Assistance – Eclipse doesn’t just let you write code; it helps you write better code. Features like code auto-completion, real-time error detection, syntax highlighting, and refactoring tools make development faster and reduce mistakes.
- Strong Community Support – If you ever get stuck, there’s no shortage of help. Eclipse has a huge community that provides forums, tutorials, video guides, and documentation, making it easier to find solutions to any problem you encounter.
2. Download and Install Eclipse IDE for Java
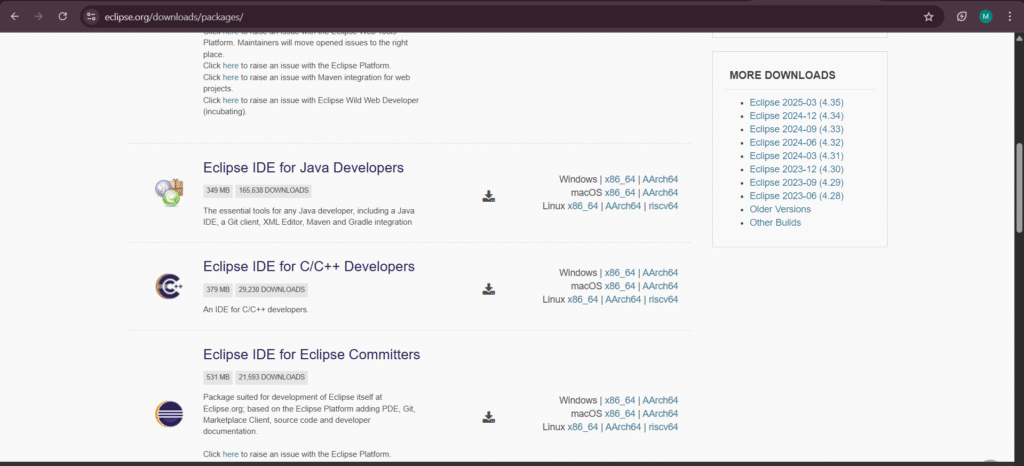
- Visit the official Eclipse downloads page
- Click “Download x86_64” for your operating system (Windows, Mac, or Linux).
- Save the installer file:
- Windows:
eclipse-inst-win64.exe - Mac:
eclipse-inst-mac64.dmg - Linux:
.tar.gzfile
- Windows:
3. Installing Eclipse IDE
Windows
- Double-click
eclipse-inst-win64.exe. - Choose Eclipse IDE for Java Developers.
- Select your installation folder (default is fine).
- Click Install and accept the license agreement.
- Once done, click Launch.
Mac
- Open the
.dmgfile. - Drag the Eclipse icon into Applications.
- Open Eclipse from Applications.
Linux
- Extract the
.tar.gzfile:tar -xvzf eclipse-inst-linux64.tar.gz - Navigate to the extracted folder and run the installer:
./eclipse-inst - Follow the same steps as in Windows to install.
4. First-Time Configuration
- Workspace Setup – When Eclipse starts, it will ask for a workspace location (where your projects are stored). Example:
C:\\Users\\YourName\\EclipseWorkspace - Theme & Font Size – Go to Window → Preferences → General → Appearance to switch between Light/Dark themes and adjust fonts.
- Install Plugins – Use Help → Eclipse Marketplace to install extra tools like Python, Git integration, or Maven support.
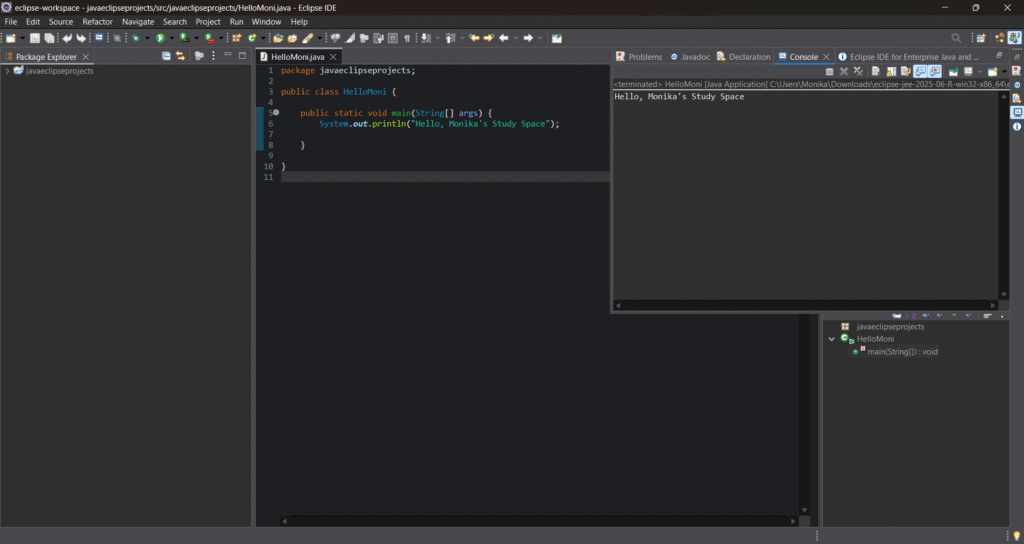
5. Creating Your First Java Program
- Go to File → New → Java Project.
- Project Name:
FirstJavaProject - Click Finish.
- Project Name:
- Right-click src → New → Class.
- Class Name:
HelloWorld - Check public static void main(String[] args).
- Class Name:
- Paste this code:
public class HelloWorld {
    public static void main(String[] args) {
        System.out.println("Hello, Monika's Study Space);
    }
}
- Save (
Ctrl + S) and click the Run button (green play icon).
6. Troubleshooting Common Issues
- Eclipse says “No Java installed” – Download and install the latest Java JDK from:
https://www.oracle.com/java/technologies/javase-downloads.html - Eclipse runs slow – Edit the
eclipse.inifile and increase memory:-Xms512m -Xmx1024m - Error creating a project – Ensure the workspace path has no special characters or spaces.
7. Productivity Tips for Eclipse
- Keyboard Shortcuts:
- Run:
Ctrl + F11 - Search:
Ctrl + H - Format code:
Ctrl + Shift + F
- Run:
- Use Code Templates: Go to Preferences → Java → Editor → Templates to create reusable code snippets.
- Enable Auto Save: Window → Preferences → General → Editors → Autosave to save files automatically.
8. Final Thoughts
Installing Eclipse IDE for Java is simple if you follow these steps carefully. Once you’ve set it up, you’ll have a powerful, customizable, and beginner-friendly environment for writing Java programs. With plugins and themes, you can make Eclipse truly your own, and with keyboard shortcuts, your coding speed will improve over time.
If you’re serious about Java development, learning Eclipse deeply will be one of your best investments in time.
You May Also Like
- Java Introduction to Programming: My Exciting Day 1 Journey from Zero to Beginner
My personal first-day experience learning Java — from setting up the environment to writing my very first program. - Java Learning Roadmap 2025 – From Zero to Hero
A step-by-step guide to how I plan to learn Java in 2025, perfect for beginners like me. - Aptitude Tricks for Beginners – Easy Mental Math Techniques
Quick tricks for multiplication, LCM, squaring, and cubes — useful for placement and coding exams. - Types of Nouns in English Grammar – Simple Explanation with Examples
Learn all types of nouns clearly with examples — great for communication skills and competitive exams. - Data Cleaning with Titanic Dataset – A Beginner’s Guide
Learn the complete, beginner-friendly process of cleaning and preparing the Titanic dataset for machine learning, with practical examples and tips. - History Of Java Programming Language
Pingback: Aptitude Roadmap for Placement Preparation: Complete Guide for Engineering Students - Monika's Study Space